
ReActor for Stable Diffusion can help you keep a consistent face from photo to photo, in both txt2img and img2img.
This tool came at the right time, given the discontinuation of Roop, the OG face swap tool. ReActor is a great Roop alternative.
I found the installation and use to be easy, and I think you can do it too.
Let’s take a look at the results to see if ReActor is for you.
Table of Contents
- Tutorial overview
- Sample face replacements
- txt2img to keep face but change background
- Keeping a consistent face with ReActor
- txt2img
- Inpaint to keep face but change a facial expression?
- Final touch ups in Photoshop
- Faces not sharp? Enable Restore Face and upscale.
- How to choose face to restore with multiple people in ReActor
- Download and install ReActor for Stable Diffusion
- protobuf error with sd-webui-reactor
- CFG, denoising charts
- Face swap without reference photo?
- More AI tutorials
Tutorial overview
This tutorial will teach you how to use Stable Diffusion and a reference photo. ReActor will blend the reference photo into another face. This means you can keep the same face consistently throughout the photos.
However, if you want to use Stable Diffusion to do a face swap without a reference photo, I have a better tutorial here.

Sample face replacements
I got a bunch of images keyworded “faces” off Pixabay, and we’re going to designate this face as the one that we’re going to want cloned.
Reference face that we will keep between photos

I placed it across various images with different lightings, different facial features, skin tones, multiple people, etc.
Here are some images using the Inpainting technique. This technique preserves the original image and only replaces the face.
Inpaint to keep background while changing face
Before on the left, after on the right.


txt2img to keep face but change background
txt2img is much more dynamic. You can alter expressions, hair colour, clothing, background.
Of course, you get the typical issues like problems with fingers.


Keeping a consistent face with ReActor
Now that you have seen the sample images, you’ll have to decide:
- Inpainting if you want to keep the original background and replace only the face.
- txt2img if you want to generate a background while keeping the face.
txt2img
In Automatic1111, scroll down and open the ReActor tab. Then, drag your photo into the image input box, and click Enable.

Then, generate an image as per normal including writing your prompt, negative prompt, choosing your checkpoint, etc.
I had good results with Realistic Vision 2.0 as my checkpoint, using DPM++ 2M Karras with 20 steps.
Inpainting

Say you want to keep the rest of the image the same but only change the face.
In order to do this, you should use Inpaint, which can be found on img2img > Inpaint
Keeping the prompt input boxes empty will allow you to maintain the facial expression from the reference image.
Inpainting technique: I’d recommend you outline the whole face including ears. Let Stable Diffusion decide what it wants to modify and what not to.
I noticed that if I leave a little skin out, say the forehead, I can end up with imperfectly blended faces.
I generally leave everything as default, but make sure to change the dimensions to your input image’s dimensions.
Inpaint to keep face but change a facial expression?
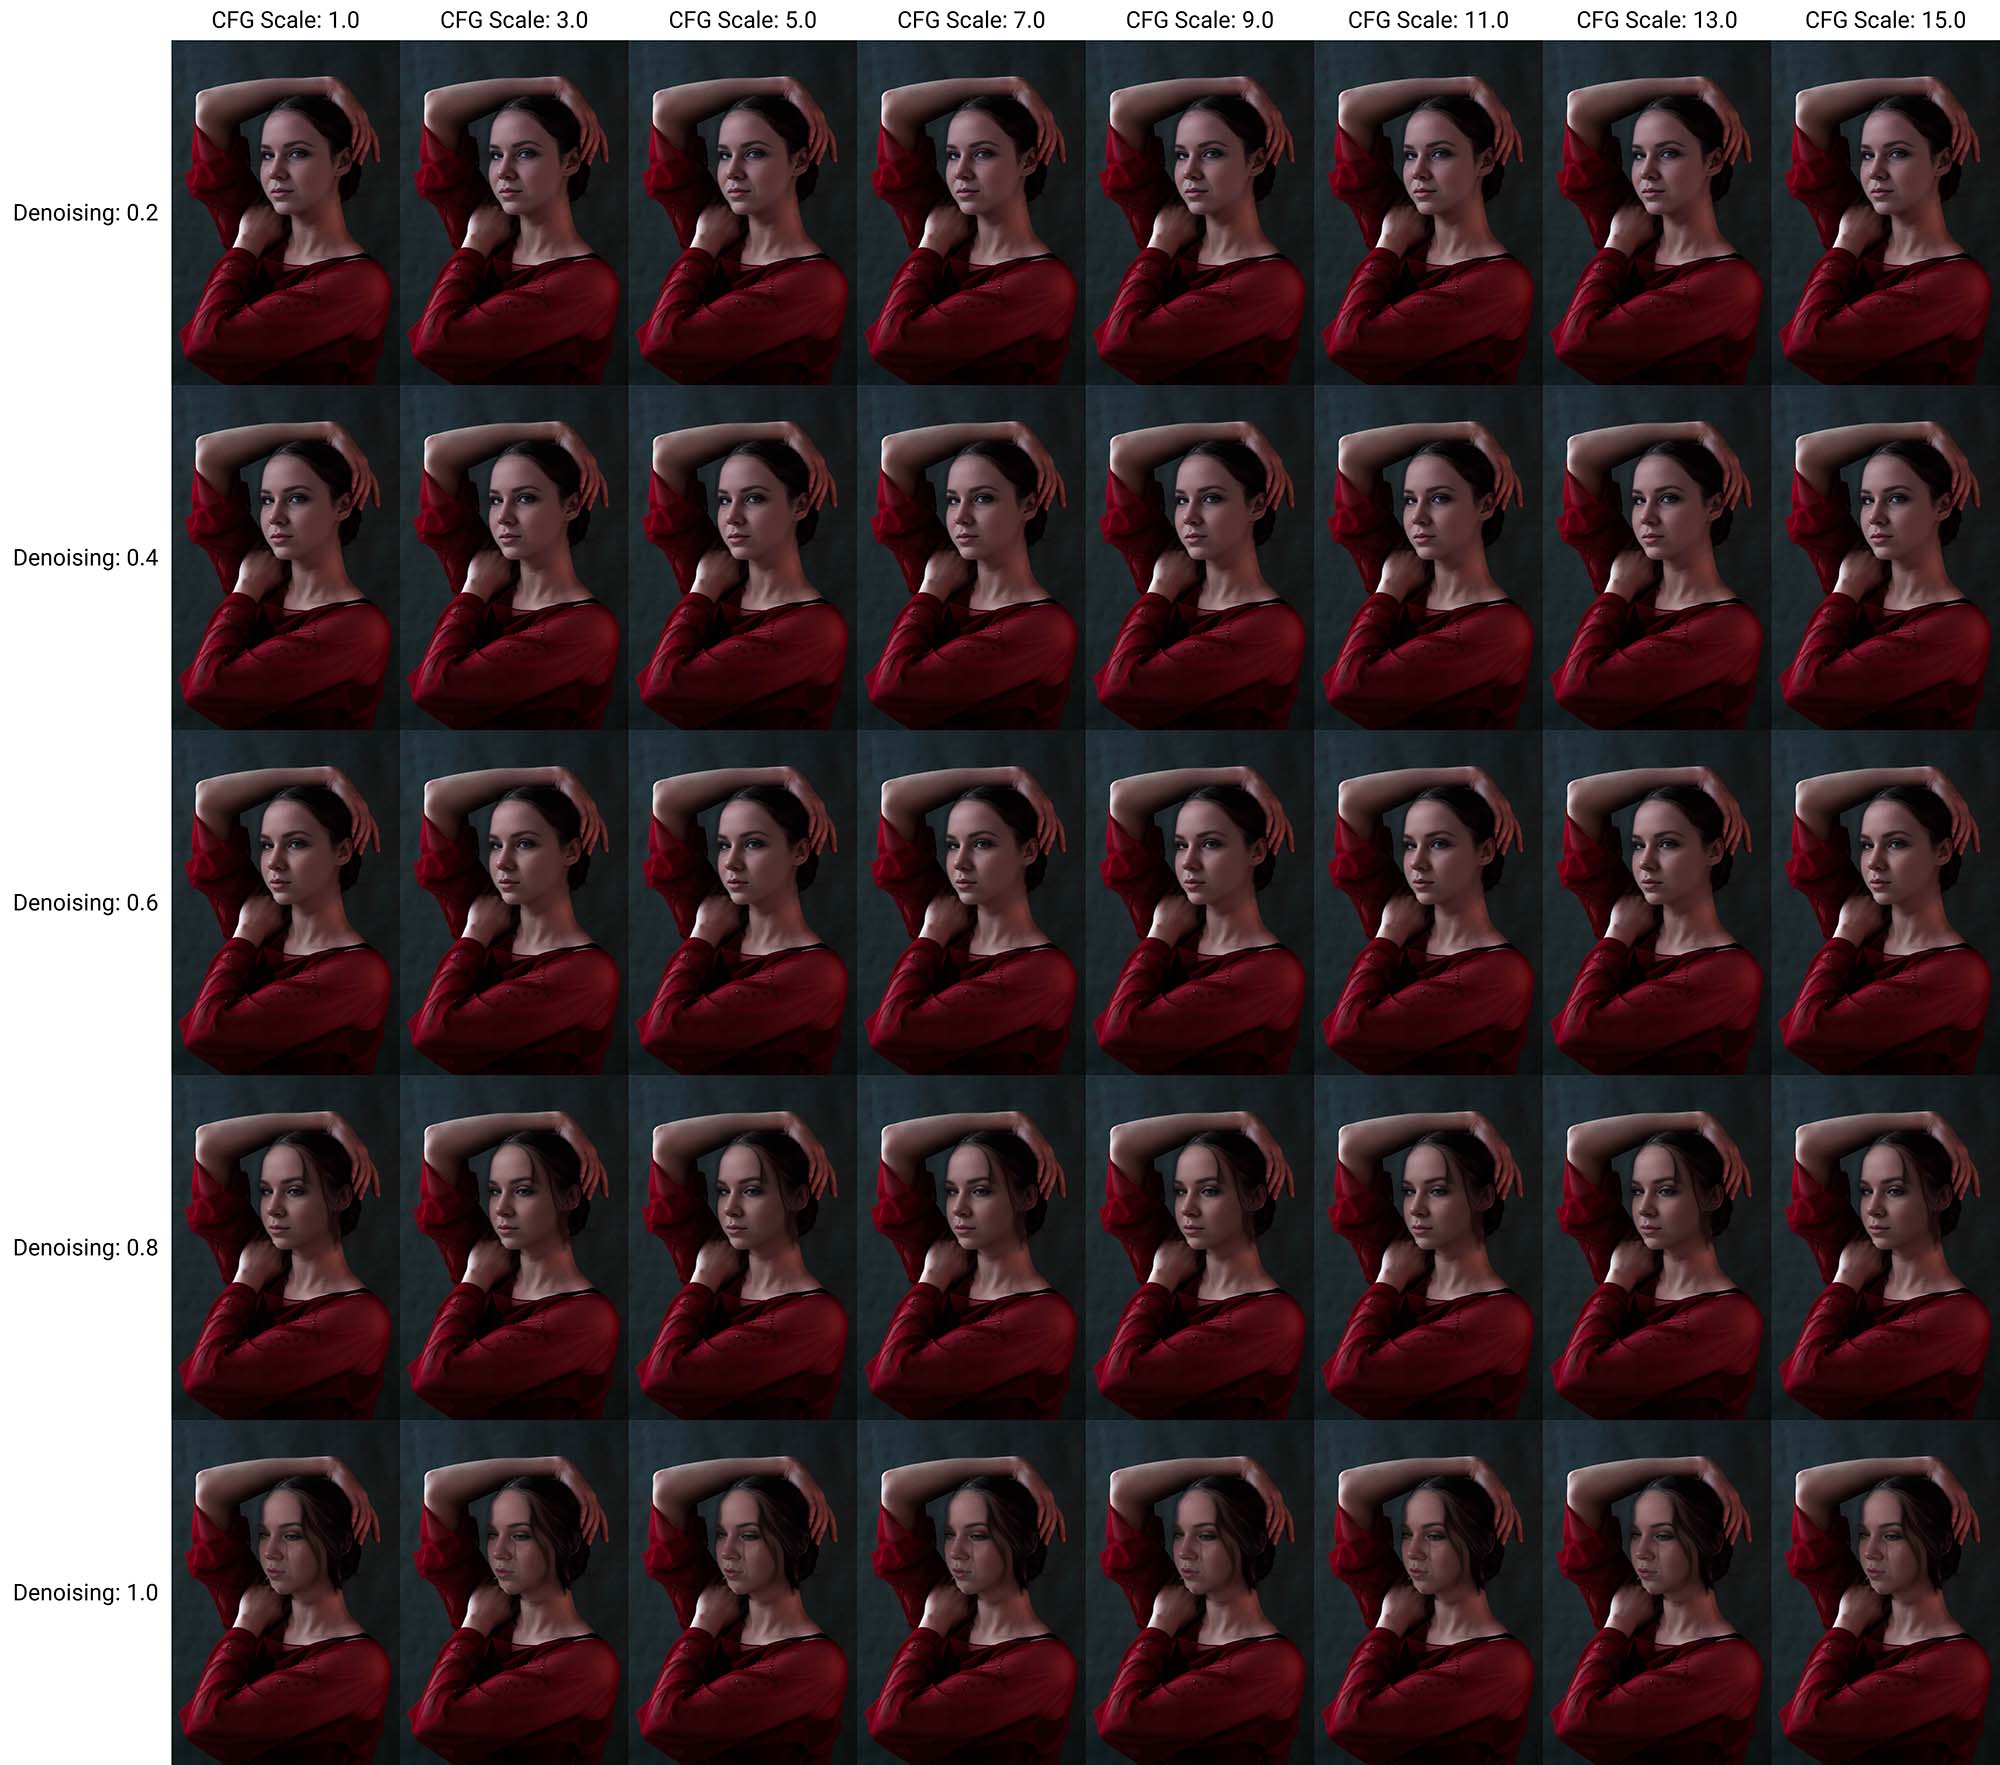
Yeah, that’s possible too, but you will need to get a grasp of the perfect CFG and denoising values.
First, you will need to write something in the prompt box. I put in “smiling woman face”
Then, go to the bottom where it says “Script”. Enable the X/Y/Z Plot.
For X, choose CFG Scale and enter the values 1,5,9,13,15
For Y, choose Denoising and enter the values 0.2,0.5,0.8
Press generate and you will see how Stable Diffusion morphs the face as values change. The sweet spot is CFG 5.0 to 15, and the denoising value’s sweet spot is 0.5.
You can get finer control over the values by using this technique.
Disable the script and then go back up to enter the CFG and denoising values. Then, generate!
Final touch ups in Photoshop
How far away are we from the original image’s quality?
One issue that I have with most AI-generated images is that they can look very plasticky. For example, the images above can lose highlights and imperfections in skin that make them look “real”.
Which is why… you will always need to take these images into Photoshop.

Since we have a reference image, what I would do is this:
Green area: clone the texture into these areas. Use frequency separation on the original image and restore details on the green part.
Yellow part: the eyes are a bit messed up. Aligning the pupils is necessary.
Red part: Oops, my inpainting boundaries went a bit further than I wanted. Got to restore this using the original photo.
Faces not sharp? Enable Restore Face and upscale.
ReActor’s GitHub covers certain aspects that you should know about.
If the face is blurry, make sure to enable the “Restore Face” option, at the bottom of the ReActor window.

You can also try using an upscaler.
I like using 4x-UltraSharp as my default upscaler.
How to choose face to restore with multiple people in ReActor
Let’s say you have multiple people in your photo. How do you choose?
You’d use img2img for this.
Go to the part where it says “source image” and “target image”.
In the source image, choose the face you want to clone. Usually it’s number zero, since you’ll only have one face in the source image.

For the target image, count the faces from left to right. The first face is 0, then 1, 2, 3, etc.

So, yes, if you want to clone both faces, type in “0, 1”

Download and install ReActor for Stable Diffusion
I took these steps in order to get it to work, but your mileage may vary.
If you have any issues, you should check out the troubleshooting section at ReActor for Stable Diffusion’s GitHub.
Installation with Automatic1111 is done using these steps:
- (For Windows Users):
- Install Visual Studio 2022 (Community version, for example – you need this step to build some of dependencies): https://visualstudio.microsoft.com/downloads/
- OR only VS C++ Build Tools (if you don’t need the whole Visual Studio) and select “Desktop Development with C++” under “Workloads -> Desktop & Mobile”: https://visualstudio.microsoft.com/visual-cpp-build-tools/
- OR if you don’t want to install VS or VS C++ BT – follow this steps (sec. VIII)
- In web-ui, go to the “Extensions” tab and use this URL
https://github.com/Gourieff/sd-webui-reactorin the “Install from URL” tab and click “Install” - Please, wait for several minutes until the installation process will be finished
- Check the last message in your SD-WebUI Console:
- If you see the message “— PLEASE, RESTART the Server! —” – so, do it, stop the Server (CTRL+C or CMD+C) and start it again – or just go to the “Installed” tab (if you have any other Roop-based extension enabled – disable it, otherwise this extension won’t work), click “Apply and restart UI”
- If you see the message “Done!”, just go to the “Installed” tab (if you have any other Roop-based extension enabled – disable it, otherwise this extension won’t work), click “Apply and restart UI” – or you can just simply reload the UI
ReActor’s GitHub also has instructions for SD.Next and Cagliostro Colab UI.
protobuf error with sd-webui-reactor
When I first installed ReActor, I got a protobuf error that stated that my version is too new at 3.21.x
I tried reinstalling PyTorch but that didn’t work.
I managed to troubleshoot it using these steps:
- Close (stop) your SD WebUI Server if it’s running
- Go to the (Windows)venv\Lib\site-packages or (MacOS/Linux)venv/lib/python3.10/site-packages and see if there are any folders with names start from “~” (for example “~rotobuf”), delete them
- Go to the (Windows)venv\Scripts or (MacOS/Linux)venv/bin run Terminal or Console (cmd) there and type activate
- Then:
python -m pip install -U pip
pip uninstall protobuf
pip install protobuf==3.20.3 - If this method doesn’t help – there is some other extension that has a higher version of protobuf dependence and SD WebUI installs it on a startup requirements check
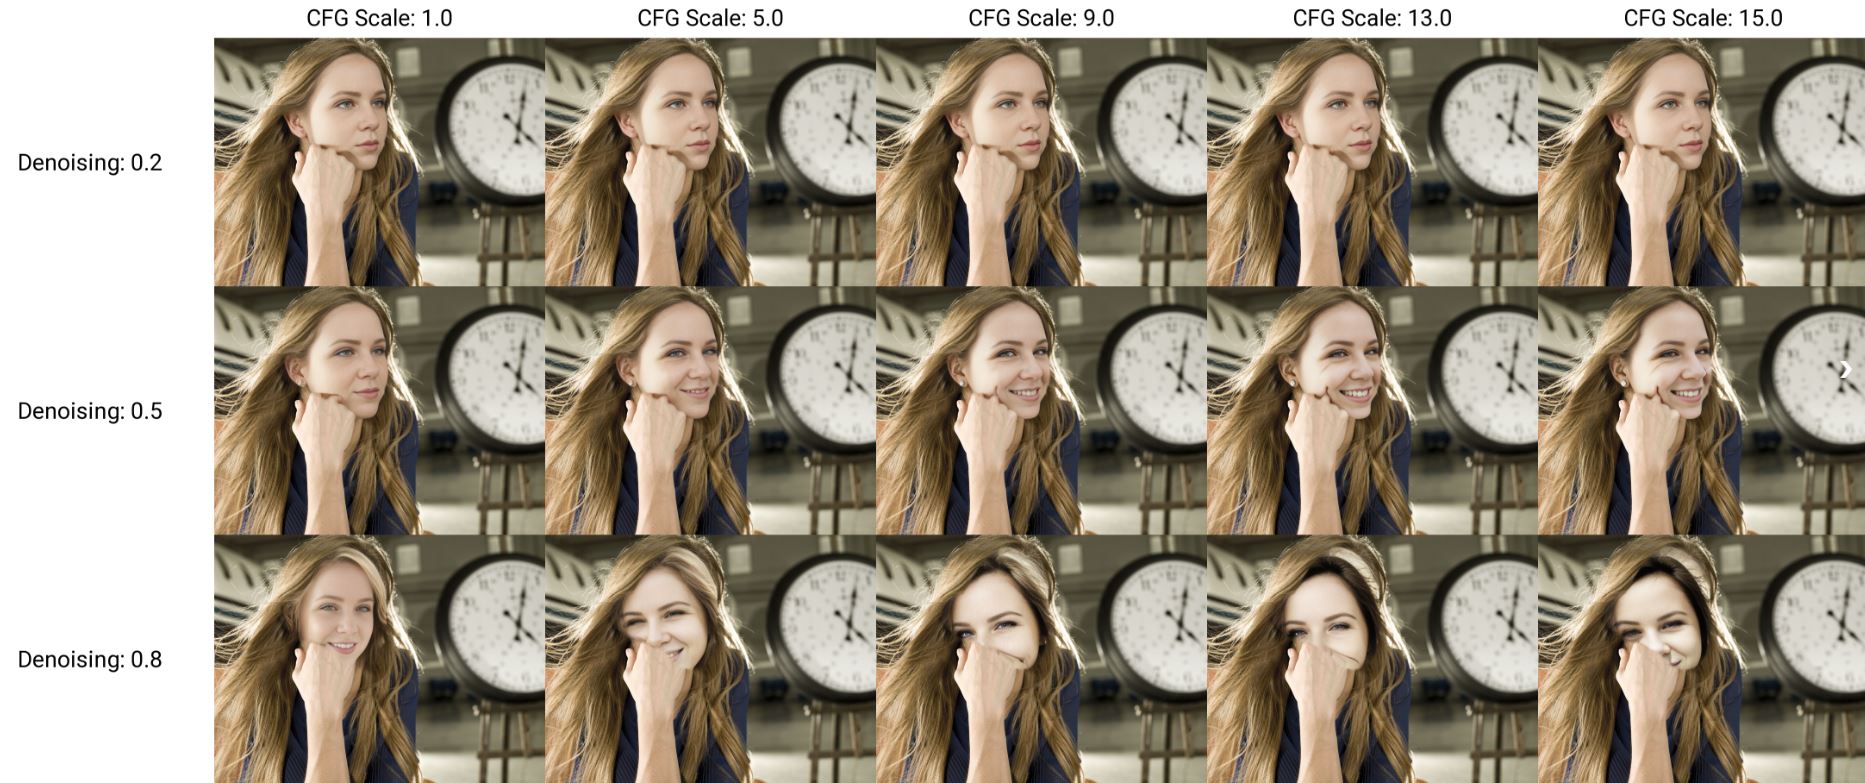
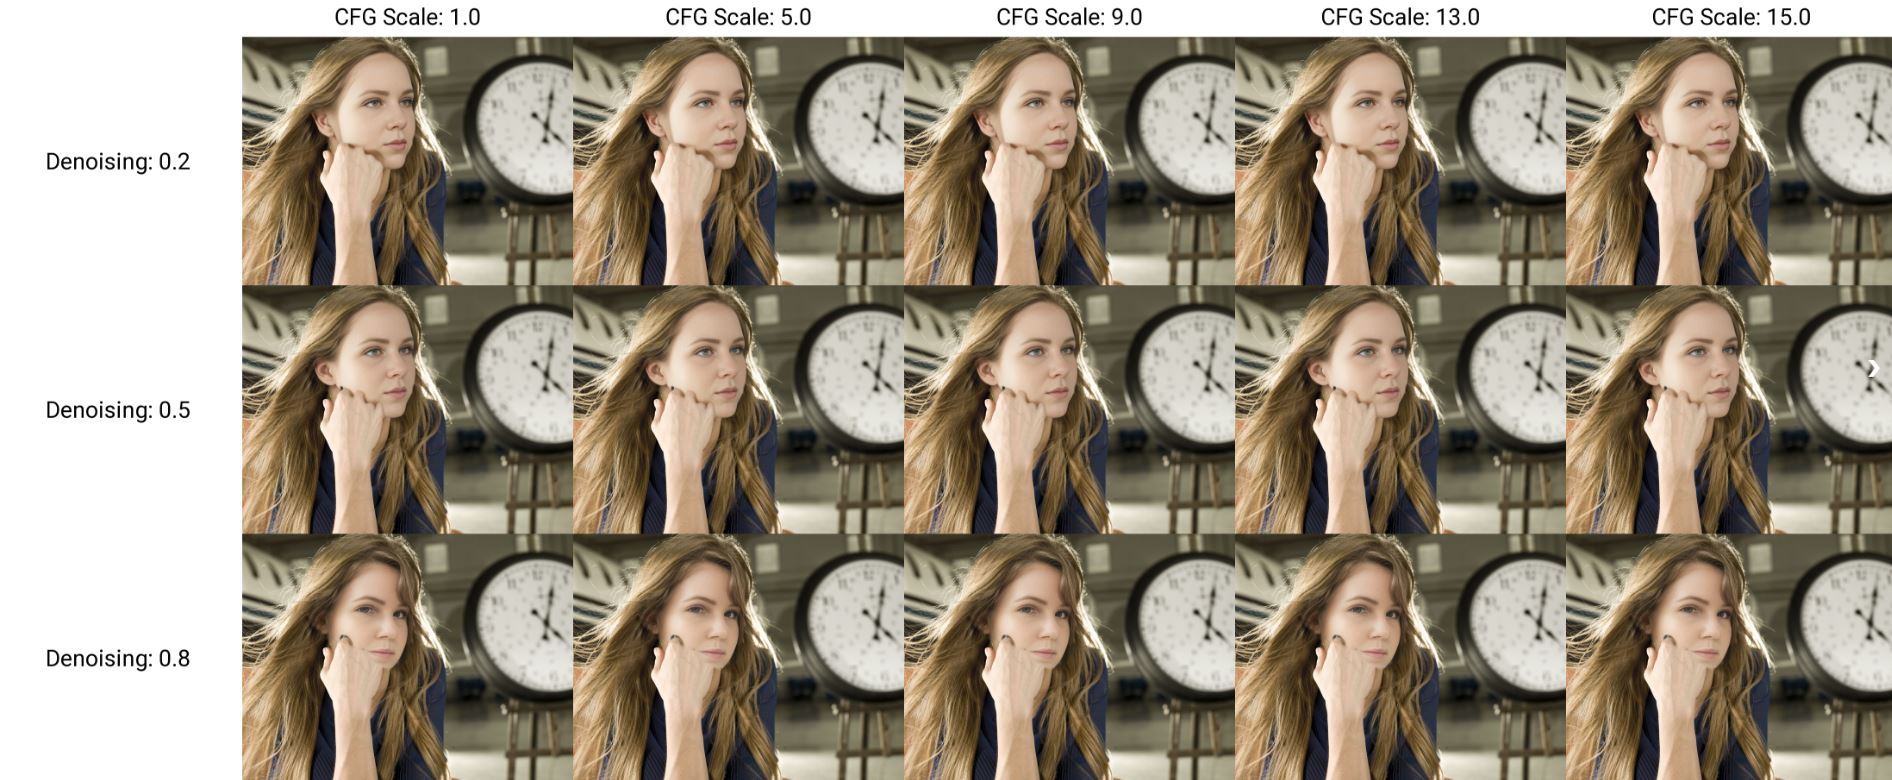
CFG, denoising charts
For your reference, here are the CFG Scale and denoising plots.
My conclusions:
- Too much denoising will ruin your image
- Lower denoising will stay truer to your original image
- If you want to change your reference photo’s facial expression, you will need to find the right denoising/CFG point. Run a X/Y plot to find the sweet spot, here’s how to efficiently write parameters..
Face swap without reference photo?
Yes, you can do it. Before Roop came onto the scene, I wrote a tutorial on how to do a face swap without a reference photo,
Basically, if you had a stock photo where everything is perfect but the person didn’t fit your demographics, you can use SD to swap the face out.
More AI tutorials


Have a project in mind?
Websites. Graphics. SEO-oriented content.
I can get your next project off the ground.
See how I have helped my clients.
